Required Packages to install after a Jailbreak
Posted by Sébastien Stormacq in iPhone on 26/05/2012
 |
Here is a short list of packages I am installing after a jailbreak.
|
Then connect to your phone using ssh (root/alpine) AND CHANGE THE ROOT PASSWORD !!
And because I care about security, I also apply the following :
- Create
.ssh/authorized_keys
to copy my public SSH key. This allows key based authentication
- Disable SSH’s password authentication in /etc/ssh/sshd_config
PasswordAuthentication no
PermitEmptyPasswords no
- Restart sshd dameon
iPhone:~ root# launchctl stop com.openssh.sshd
iPhone:~ root# launchctl start com.openssh.sshd
Enjoy !
<UPDATE date=”23 September 2012″>
iPhone 3GS and iPhone 4 owners can jailbreak iOS 6 in tethered mode (need a cable connection to boot the phone)
http://www.ijailbreak.com/jailbreak/how-to-jailbreak-ios-6-and-install-cydia-mac-os-x/
</UPDATE>
Using Apple’s XCode for open application development
Posted by Sébastien Stormacq in Apple, iPhone on 25/05/2012
When developing iOS application for jailbroken devices, you have to take care of many dirty details of application deployments on iOS. In particular, you have to take care of creating and registering your own development certificate, as detailed below.
This is where IOSOpenDev comes into the game, this packages a set of XCode plugins that automates most of this process. More than that : it also provides templates (aka empty project) to build your own Widgets, command line applications, SBSettings etc …
IOSOpenDev is a must use if you are serious about jailbroken app development on iOS.
But just for the sake of archiving – or if you want to do it manually, here is the process to code sign an application without using Apple’s provided certificate.
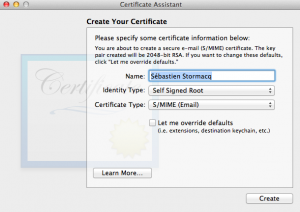
1/ generate self signed certificate using the Certificate Assistant in KeyChain Access application
2/ tell Xcode to use that identity
3/ change XCode signature method (and restart XCode)
marsu:Contents sst$ sudo cp Developer/Platforms/iPhoneOS.platform/Info.plist Developer/Platforms/iPhoneOS.platform/Info.plist.orig
Password:
marsu:Contents sst$ sudo /usr/bin/sed -i .bak 's/XCiPhoneOSCodeSignContext/XCCodeSignContext/' Developer/Platforms/iPhoneOS.platform/Info.plist
marsu:Contents sst$ ls Developer/Platforms/iPhoneOS.platform/Info.plist*
Developer/Platforms/iPhoneOS.platform/Info.plist Developer/Platforms/iPhoneOS.platform/Info.plist.orig
Developer/Platforms/iPhoneOS.platform/Info.plist.bak
scp -r MyApp.app root@ip_address:/Applications
Dreambox Second Stage Bootloader update
Posted by Sébastien Stormacq in Dreambox on 12/03/2012
 |
You might have notice issues when upgrading to recent Dreambox firmware since last September. This is because Dream Multimedia GmBH released a new Second Stage Boot Loader and new firmware are relying on it for their boot sequence. Without going into all the glory details, you have to know that most computers (yes your Dreambox is a computer) use a two stages boot system. First an initial boot loader is executed from internal memory at startup time. This boot loader usually executes some low level hardware sanity checks then look for a piece of software at a designated place, such as sector 0 of your primary hard drive or sector zero of your flash memory disk. This piece of software might be a full blown OS or a “second stage boot loader” which will allow you to select which OS to boot or to perform additional kernel tuning.At the time of this writing, latest Second Stage Boot Loader for Dreambox family is SSL 84 (and hacked version 84a and 84b have been created for Dreambox clones) |
How to check which second stage boot loader is installer ?Telnet to your dreambox (username is root, default password is dreambox – unless you changed it) and issue the following commands : Sebastiens-MacBook-Pro:~ sst$ telnet 192.168.0.96 Trying 192.168.0.96... Connected to dreambox800. Escape character is '^]'. OpenEmbedded Linux dm800 openpli 2.1 dm800 dm800 login: root Password: root@dm800:~# opkg list | grep secondstage dreambox-secondstage - 84-r0 - Dreambox second stage bootloader dreambox-secondstage-dev - 84-r0 - Dreambox second stage bootloader Then you know for sure your second stage boot loader version How to install a second stage boot loader ?Download the right second stage boot loader NFI file from http://www.dreamboxupdate.com (be sure to select the right file, depending on your dream box model) Links are within the Blue Rectangle text, starting with “05 September 2011 – Improved flash error correction” Once the NFI file is downloaded on your PC :
Disclaimer : these instructions are specific to original Dreamboxes, other methods are available for VU+ family of receivers. Enjoy ! |
|
Using MacPorts with Xcode 4.3.x
Posted by Sébastien Stormacq in Apple, Mac OS X on 11/03/2012
If you recently updated to the MacAppStore distribution of Xcode, you certainly noticed that the /Developer directory is not used anymore. Xcode now lives in standard /Applications directory.
This confuses tools relying on Xcode, such as some MacPorts package relying on Xcode to compile code on your machine before installation.
For example :
---> Fetching archive for zlib
---> Attempting to fetch zlib-1.2.6_0.darwin_11.x86_64.tbz2 from http://packages.macports.org/zlib
---> Fetching zlib
---> Attempting to fetch zlib-1.2.6.tar.bz2 from http://lil.fr.distfiles.macports.org/zlib
---> Verifying checksum(s) for zlib
---> Extracting zlib
Error: Couldn't determine your Xcode version (from '/usr/bin/xcodebuild -version').
(more line stripped for clarity)
This can be solved with a single command line terminal, to tell Xcode command line tools the new location of Xcode.
sudo xcode-select -switch /Applications/Xcode.app/Contents/Developer/
I am still unsure this an Apple bug or a MacPort bug … I am keen to read your opinion about this.
Enjoy !
Apple patches 3 years old bug
Posted by Sébastien Stormacq in Apple, Mac OS X on 01/03/2012
There are so many blogs written to criticize Apple, how big, arrogant and control freak they become over the last pas years (some will say they always have been control-freak…) that I wanted to write this post to actually say “Kudo Apple ! & Thank you”
I am using MacBookPro’s since the last 6-7 years or so. The last one I acquired is the Late 2008 model. This machine suffered from day #1 of a serious display issue : the upper part of the screen flickers under some load / heat condition.
Problem has been reported numerous times to Apple and the discussion about this issue on Apple’s Support Community forum contains more than 1500 messages posted and close to 190.000 views !
Yesterday, Apple quietly release an EFI firmware patch to address this issue. Yes, you read it right, Apple did release a firmware patch for a 4 years old machine. This is so unusual in (consumer) IT industry to mention.
I applied the patch yesterday after having spent an hour or so reading comments from early adopters and I have the pleasure to work on my machine since then without any single screen flickering.
Thank you Apple to take care of old customers, old machines and continue to improve your products.
Solving VMWare Crashes on Linux SMP Kernels
Posted by Sébastien Stormacq in Linux on 12/09/2011
I am writing this blog entry as a note to myself, to keep track of this issue and, more importantly, the solution I found.
Problem Statement:
When running VMWare Player or Workstation on a Linux host, with multiple processors (or cores), on a 64 bits kernel, VMWare Player and Workstation keep crashing with error
vcpu-0:ASSERT vmcore/vmm/main/irq.c:100 bugNr=2293
Root Cause:
After some Googling and searching VMWare’s Knowledge Base, I found this article referring to an issue with Non Maskable Interrupts (NMI) in Linux Kernels 2.4 and later.
It appears that Suse and RedHat Linux have this setting enabled by default, as shown by
$ cat /proc/sys/kernel/nmi_watchdog
 1
Workaround:
Disable NMI watchdog.
At runtime, by typing (as root)
echo 0 > /proc/sys/kernel/nmi_watchdog
At boot time, by modifying Grub configuration by adding
nmi_watchdog=0
to the
kernel
line in
/boot/grub/grub.conf
and reboot
Interesting side note : this also solves my problem of running these VMWare create virtual machines under VirtualBox
Enjoy !
MacPort on Mac OS X Lion
Posted by Sébastien Stormacq in Apple, Mac OS X on 21/07/2011
If you have performed a fresh install of Mac OS X Lion or if you plan to install MacPort after having installed Lion, you will soon realize that the MacPort team does not distribute (yet) a Lion installer. Snow Leopard installer will fail when detecting Lion.
Question is therefore : how to install MacPort on Lion ? Answer : install it from the sources.
It might be scarry, but it is very easy, here are the details.
Preriquisite : install Aple’s development tool XCode. It is freely available from the App Store (be patient it is a 3.5 Gb download)
- Open a terminal
- create a directory for the sources
mkdir macport.sources
- Fetch the sources
cd macport.sources
sudo svn checkout http://svn.macports.org/repository/macports/trunk
- Compile
cd trunk/base
sudo ./configure --enable-readline
sudo make install
- Install
sudo make distclean
- Change your profile to include MacPort in the PATH
vi $HOME/.profile
#!/usr/bin/bash
# MacPort
export PATH=$PATH:/opt/local/bin
- Source your profile to include the changes
. $HOME/.profile
That’s it ! Easy as I promised.
You can now search for package with
sudo port list | grep <your search>
and install packages with
sudo port install <package name>
Enjoy !
Beta Testing iPhone Applications
Posted by Sébastien Stormacq in Apple, iPhone, Oracle, Personal on 08/06/2011
| I am about to release another iPhone application allowing users to visually manage voice mail messages left on their enterprise messaging solution, based on Oracle Beehive Collaboration and Communication Suite.
This application is similar to Apple’s Visual Voice Messaging application that is deployed for some carriers. Testing an iPhone application before it is deployed through the App Store might be tricky and is reserved for users having a minimal technical knowledge. This article describes the steps required to join a testing program and to collect logs and debugging information to be reported to the developer. Before installing an application on your iPhone, it has to be digitally signed by the developer and by Apple (when distributed on the App Store). For ad-hoc distribution, i.e., without going through the App Store, the application will be signed specifically for your device. The developer needs to know your Device ID (UDID). |
 |
Step #1 – collect your UDID and send it to the developer
First step for beta testing an iPhone application is to collect your UDID and send it to the developer.
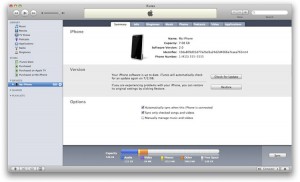
To do this, connect your device to your Mac/Windows and launch iTunes. In iTunes, select your device in the ‘Devices’ section and navigate to the Summary tab. Click on the Serial Number label to reveal the Identifier field and the 40 character UDID. Press Command+C (CTRL-C on Windows) to copy the UDID to your clipboard. Then paste it (Command+V or CTRL-V) in a mail message.
Step #2 – Install application
Once the developer knows your UDID, he will generate an application’s release authorized to run on your device. Most of the time, you will receive the application as a ZIP file through email or web site download.
- Unzip the file you received
- Drag’n drop the application in iTunes
- Sync your device with iTunes to install the application
You should then see the application icon on your device.
Step #3 – Provide feedback and collect log files for crashes
We are interested to collect all kind of feedbacks and testing conditions
- General application usage, ergonomy, performance etc … many of these are subjectives but all suggestions will be considered. Sometimes suggestions will be integrated immediately, sometimes they will be planned for a future release.
- Different devices – you’re mostly welcome to test on older iPhone, iPod Touch or even iPad.
- Slow / poor network connection. Real life network conditions are difficult to test on a development machine, only real life usage, on the street, in a cab, in an airport etc …
If the application crashes or if you think you’ve find a bug, please report it as precisely as possible, in particular, I would like to know
- what version you are using ? (version number is provided in the mail with the application)
- what device you are using ?
- what are the precise steps to reproduce ?
- is it always reproducible or not ?
The application generate a log file that contains a precise description of what happens within the application. Here are the steps to collect and send me log files.
- Download Apple’s iPhone Configuration Utility (Mac and Windows)
- With your device connected, run the iPhone Configuration Utility
- Click your connected device
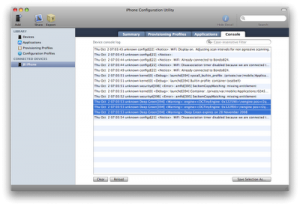
- Go to the Console tab (see screenshot below)
- Clear the log (button at the bottom to the left)
- Try to install and/or launch the application and reproduce the error
- Select the relevant log lines (or just everything)
- Click the Save Console As… button and save the file
- E-mail the file to me
That’s all for now. Thank you for your valuable feedback !
JDeveloper Major Release – 11.1.2
Posted by Sébastien Stormacq in Java, Oracle on 08/06/2011
This week, Oracle released a major new version of JDeveloper IDE, version 11.1.2
What’s new ?
- The plugin system has been revamped and is now based on OSGi
- The startup time has been dramatically reduced. (We will need to find another activity to allow us for a cup of coffee – or two – in the morning)
- Integration with Maven 2
- Support of JSF 2
- And, for Mac users using OpenJDK 7, no more need to hack your Java installation to make the installer happy. (when using Apple’s provided JDK 1.6, you still have to follow these instructions)
You can download it from OTN. Have a look at the release notes and the user documentation.
enjoy !
[UPDATE]
I have to admit that the startup time has improved much ! On my Macbook Pro (Core 2 Duo 2.66Ghz / 4GB RAM – Apple JDK 1.6.0_24), a warm start gives the JDeveloper 20 secs to get the main Window. Weblogic seems to follow this path too with an impressive 11 secs to status [RUNNING].
QR Codes for your business cards
Posted by Sébastien Stormacq in Android, General, iPhone, Personal on 28/05/2011
You’ve probably already encounter QR Codes, these signs you can scan with your mobile’s camera to get some extra information about a product, a song, a TV program etc …
While there are many QR generator application available on the Net, I recently found a Business Card generator. It is able to generate either VCARD or MECARD format, as well as a contact PDF sheet ready to send to the printer. (MECARD is a special encoding of personal information, suitable for QR Code Encoding. This was popularized in Japan by NTT Docomo)
And, … it’s free 🙂
I tried it with QR Reader on the iPhone and found it particularly well integrated. In particular MECARD can directly be added or merged to your address book.
Have Fun !


