WebSphere Liberty Profile Cluster Sharing an In-Memory Data Grid
Posted by Sébastien Stormacq in IBM, Java, Mac OS X on 14/10/2012
WebSphere Liberty Profile is a fast, lightweight and simple Java web application container allowing developer to develop, test and deploy applications easily. In my previous articles, I explained how to install Liberty Profile on Mac and how to develop and deploy your first REST based services.
Liberty Profile is a standalone Java container. It is not designed to be included in larger deployments based on WebSphere Application Server ND cells.
However, Liberty Profile can take benefit of a shared persistence engine to store HTTP Session data. This allows two or more independent Liberty Profile instances to share a common user session for web applications. When one instance fails, the surviving instances can continue to serve user requests as-is nothing happened.
Persistent data store might be a relational database (such as Derby used for development purposes) or a in-memory data grid. In-Memory Data Grid are software solutions providing in-memory data storage, replicated across different containers (or machines). Many IMDG solutions are available from different vendors or in open-source. Most common ones are MemCached, Terracotta (Software AG), Coherence (Oracle) and IBM’s WebSphere eXtreme Scale.
If you are totally new to eXtreme Scale, I would recommend to read some basic information about its architecture before continuing to read this article.
Configuring WebSphere Application Server (WAS – full profile) to store HTTP Session in a eXtreme Scale container is a matter of three clicks in WAS admin console. It is slightly more complicate with Liberty Profile, just a few configuration steps described below.
There are four different ways to install eXtreme Scale (XS) with Liberty :
- Run XS Container in a separate JVM or separate machine than Liberty Profile
- Run XS Container inside the same JVM as Liberty Profile
- Use Liberty Profile as client for an XS container
- Configure Liberty Profile to store HTTP Session data to an XS container
In this article, I will show you how to configure Liberty Profile to
- Start an XS server within the same JVM as Liberty profile
- Store HTTP Session data in this in-memory data grid,allowing to create clusters of Liberty Profile Instances
My final architecture is depicted in the image below.
0. Download and Install Liberty Profile and eXtreme Scale for Liberty Profile (both solutions are available at no charge from IBM – with forum based and peer-to-peer support only).
- Liberty Profile installation is described in my previous blog entry.
- eXtreme Scale for Liberty Profile installation is just a matter of unzipping the file in the directory above wlp
1. Create two servers instances
cd wlpBLOG sst:wlpBLOG sst$ ./bin/server create ServerONE Server ServerONE created. sst:wlpBLOG sst$ ./bin/server create ServerTWO Server ServerTWO created. |
2. Change default HTTP Port in both server.xml so that the two instances can run in parallel
<httpEndpoint host="localhost" httpPort="9080" httpsPort="9443" id="defaultHttpEndpoint"/> |
3. Add two features in server.xml for each server. One to tell Liberty to run an XS server embedded. And one to tell Liberty to use XS as HTTP Session store for web applications.
<!-- Enable features --> <featureManager> <feature>jsp-2.2</feature> <feature>localConnector-1.0</feature> <feature>eXtremeScale.server-1.0</feature> <feature>eXtremeScale.web-1.0</feature> </featureManager> |
4. Configure the the WXS container inside Liberty Profile : add WXS configuration in Liberty Profile
<!-- Configuration for XS Server --> <xsServer isCatalog="true" serverName="XS_ServerONE"/> <!-- Configuration for Web Application XS HTTP Session data storage --> <xsWebApp catalogHostPort="localhost:2809" objectGridType="REMOTE" replicationInterval="0" reuseSessionId="true" securityEnabled="true" sessionTableSize="0"/> |
5. Configure the the WXS container inside Liberty Profile : add XML configuration files in WLP runtime directory
In the directory WLP_HOME/usr/servers/ServerONE, create a “grids” directory and drop those two files
deployment.xml
<?xml version="1.0" encoding="UTF-8"?> <deploymentPolicy xmlns:xsi="http://www.w3.org/2001/XMLSchema-instance" xsi:schemaLocation="http://ibm.com/ws/objectgrid/deploymentPolicy ../deploymentPolicy.xsd" xmlns="http://ibm.com/ws/objectgrid/deploymentPolicy"> <objectgridDeployment objectgridName="session"> <mapSet name="sessionMapSet" numberOfPartitions="47" minSyncReplicas="0" maxSyncReplicas="0" maxAsyncReplicas="1" developmentMode="false" placementStrategy="FIXED_PARTITIONS"> <map ref="objectgridSessionMetadata"/> <map ref="objectgridSessionAttribute.*"/> <map ref="objectgridSessionTTL.*"/> </mapSet> </objectgridDeployment> </deploymentPolicy> |
objectgrid.xml
<?xml version="1.0" encoding="UTF-8"?> <objectGridConfig xmlns:xsi="http://www.w3.org/2001/XMLSchema-instance" xsi:schemaLocation="http://ibm.com/ws/objectgrid/config ../objectGrid.xsd" xmlns="http://ibm.com/ws/objectgrid/config"> <objectGrids> <objectGrid name="session" txTimeout="30"> <bean id="ObjectGridEventListener" className="com.ibm.ws.xs.sessionmanager.SessionHandleManager"/> <backingMap name="objectgridSessionMetadata" pluginCollectionRef="objectgridSessionMetadata" readOnly="false" lockStrategy="PESSIMISTIC" ttlEvictorType="LAST_ACCESS_TIME" timeToLive="3600" copyMode="COPY_TO_BYTES"/> <backingMap name="objectgridSessionAttribute.*" template="true" readOnly="false" lockStrategy="PESSIMISTIC" ttlEvictorType="NONE" copyMode="COPY_TO_BYTES"/> <backingMap name="objectgridSessionTTL.*" template="true" readOnly="false" lockStrategy="PESSIMISTIC" ttlEvictorType="LAST_ACCESS_TIME" timeToLive="3600" copyMode="COPY_TO_BYTES"/> </objectGrid> </objectGrids> <backingMapPluginCollections> <backingMapPluginCollection id="objectgridSessionMetadata"> <bean id="MapEventListener" className="com.ibm.ws.xs.sessionmanager.MetadataMapListener"/> </backingMapPluginCollection> </backingMapPluginCollections> </objectGridConfig> |
6. Tell Liberty’s session manager to reuse the same session ID for all user’s requests, even if handled by different JVM (See Liberty’s documentation for more details)
<httpSession idReuse="true"/> |
7. Start Liberty Profile
sst:wlpBLOG sst$ ./bin/server start ServerONE Server ServerONE started with process ID 11769. |
In the logs, wait for the following line
[AUDIT ] CWWKF0011I: The server ServerONE is ready to run a smarter planet.
8. Create & Deploy a simple JSP file for testing
Create a Dynamic Web Project in Eclipse, and add the following index.jsp page
<%@page contentType="text/html" pageEncoding="UTF-8"%> <!DOCTYPE HTML PUBLIC "-//W3C//DTD HTML 4.01 Transitional//EN" "http://www.w3.org/TR/html4/loose.dtd"> <html> <head> <meta http-equiv="Content-Type" content="text/html; charset=UTF-8"> <title>Liberty Profile Cluster Demo</title> </head> <body> <h1>Liberty Profile - eXtreme Scale HTTP Session Demo!</h1> <% |
Integer count; Object o = session.getAttribute("COUNT"); if (o != null) { count = (Integer) o; count = count + 1; } else { count = 1; } session.setAttribute("COUNT", count); |
%>
<h3>This counter is increased each time the page is loaded.  Its value is stored in the <code>HttpSession</code></h3>
<h3><font color="#FF0000">Counter = <%=count%></font></h3>
<h4>Page server by cluster instance : <font color="#FF0000"><b><%= System.getProperty("wlp.server.name") %></b></font></h4>
<br/>
Page generated at = <%=new java.util.Date().toString()%><br/>
<br/>
</body>
</html> |
Then deploy the WAR to the server instance (example of creating a WAR and deploying it to Liberty is given in my previous blog post)
9. Test, open your favorite browser and connect to http://localhost:9080/
You should see the following screen
Each time you will refresh the page (CTRL-R), the counter should be increased by one
Congrats, you have your first instance up and running, let’s now configure a second instance.
Repeat Steps 2-7 on a second Liberty instance to create a second cluster member. Remember to change the following
- The name of the instance
- The HTTP and HTTPS ports used by Liberty Profile (step 2 above)
- The WXS configuration – only one catalog server is needed (step 3 above, change isCatalog=”no”)
- You do not need to copy the XML files in the grids directory of the second instance (step 5) – This is only required on the instance running XS’ Catalog Server
Then deploy your test application to instance #2. To test your application, point your browser to
http://localhost:9081/<YOUR APPLICATION NAME>
You should see a page similar to the one shown at step 9 above. Try to alternatively reload the page from ServerONE and the page from ServerTWO : you should see the session counter to increase in a sequence across the two server instances.
You’ve just created your first Liberty Profile cluster with two instances and a shared in-memory grid for HTTP session storage.
I leave you as an exercise to install and configure a load balancer in front of these two instances. Hint : I am using the open-source balance for demo / test purpose.
If you find errors / typos in this (long) article, let me know – I will fix them – Thanks !
Enjoy !
How to deploy REST based web services to Liberty Profile ?
Posted by Sébastien Stormacq in IBM, Java on 08/10/2012
In my last blog entry I described how to install Liberty Profile and to configure an Eclipse based development environment. In this entry, I will show you how to develop & deploy a “Hello World” complexity REST based web service.
Official JAX-RS / Liberty profile is available on IBM Documentation web site. When developing or debugging REST based services, it is always good to know that IBM’s WebSphere Liberty profile is using Apache’s Wink implementation behind the scene.
Unlike some other Java based application servers (this one and this one for example), WebSphere Liberty Profile does not perform many under covers magical for you, in particular it does not register an application context, you will need to write (one line of) code to do that.
That being said, the process is quite similar for every application server and IDE :
1. Create a web based project
Choose a Project Name, select the runtime for deployment and uncheck the “Create EAR” option
2. add a POJO class that will serve as “resource”
Select a package name and class name.
Type the following code :
import javax.ws.rs.core.Context;
import javax.ws.rs.core.UriInfo;
import javax.ws.rs.PathParam;
import javax.ws.rs.Consumes;
import javax.ws.rs.PUT;
import javax.ws.rs.Path;
import javax.ws.rs.GET;
import javax.ws.rs.Produces;

@javax.ws.rs.ApplicationPath("resources")
@Path("/test")
public class Demo extends javax.ws.rs.core.Application {

    @Context
    private UriInfo context;

    @GET
    @Produces("application/xml")
    public String getXml() {
        return "<xml>Hello Rest World !</xml>";
    }

    @PUT
    @Consumes("application/xml")
    public void putXml(String content) {
    }
}
3. add your business code for the PUT and GET methods
4. Before deploying – Add JAX-RS “feature” to your server configuration
This will tell the Liberty kernel to load the JAX-RS server side implementation. You do not need to restart your server when adding / removing features.
5. Deploy and Test
At this stage, Eclipse’s browser will open on the application default URL and will display an error message. This is normal as we did not define a landing page or default servlet in this project (index.jsp or index.html) for example.
To access the REST web service, use this URL pattern :
http://<hostname>:<port number>/<project name>/<application path>/<path>
which translates for this example to
http://localhost:9080/TestREST/resources/test
Et voilà, you just created, deployed and tested your first REST based web service on WebSphere Liberty Profile.
Enjoy !
How to install WebSphere 8.5 Liberty profile on Mac
Posted by Sébastien Stormacq in IBM, Java, Mac OS X on 09/09/2012
WebSphere 8.5 Liberty Profile is a small, fast, agile WebSphere runtime that you – developers – can use to develop, test or embed in your applications. The runtime is provided free of charge from IBM. Like every Java EE Profile, it implements a subset of the Java EE Specification, while ensuring 100% “upwards” fidelity to the full WebSphere Application Server.
On my i7 – quad core – machine, WAS Liberty starts in less than 1 sec. With not application deployed.
Installing the runtime is as easy as unzipping a file on your drive, here are the steps
- download from wasdev.net (46 Mb only)
- unzip
java -jar wlp-developers-8.5.0.0.jar
After displaying and approving the distribution license, you will be ready for the next step
- Optional : create a server instance (an instance “defaultServer” is created for you automatically, this step is optional)
# cd wlp
# chmod u+x bin/server
# ./bin/server create MyInstance
Server MyInstance created.
- start it
# ./bin/server start MyInstance
Or just this line to start the default instance
#./bin/server start
Server MyInstance started with process ID 59946.
Now that you have the runtime, you are ready to install the tooling to manipulate it from Eclipse.
- Start Eclipse (Indigo or Juno)
- Open Eclipse MarketPlace

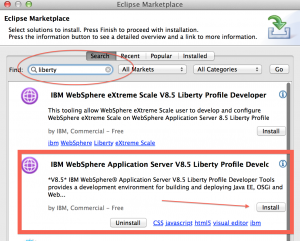
- Search for “liberty” and click on “Install”
- In the “Eclipse” menu, click on “Preferences”
- In the “Preferences” pane, select “Server”, then “Runtime Environment” and click on “Add”
- Select “WebSphere Application 8.5 Liberty Profile”
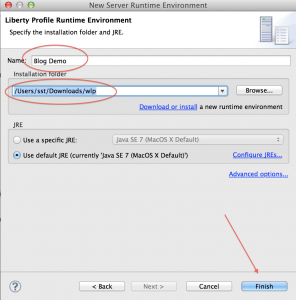
- Give the name you want, point to your Installation directory (see bullet 2 in the installation instructions above) and click “Finish”
- Switch to the “Server” window in the “Java EE” perspective
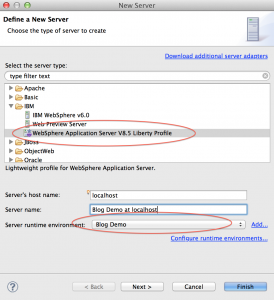
- Right-click – New -> Server, choose your newly created runtime instance
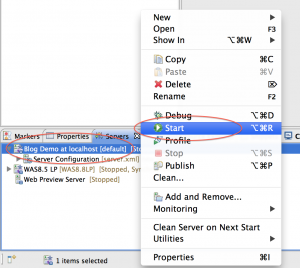
- Don’t leave the “Server” window, right click on the server name and choose “Start”
The “Console” window should automatically open, and within a few seconds, you should see the following line to appear :
Launching default (wlp-1.0.0.20120428-1251/websphere-kernel_1.0.0) on Java HotSpot(TM) 64-Bit Server VM, version 1.7.0_07-b10 (en_US)
[AUDIT   ] CWWKE0001I: The server default has been launched.
[AUDIT   ] CWWKZ0058I: Monitoring dropins for applications.
[AUDIT   ] CWWKF0011I: The server default is ready to run a smarter planet.
You have now a fully functional WebSphere Liberty profile installed and the corresponding tooling in Eclipse. The tooling allows you to stop/start the application server, but also to manage its configuration and, obviously, to deploy applications on it.
In the next blog entry, I will show you how to deploy a REST based web service on Liberty
Enjoy !
Running Android Jelly Bean on Google Nexus One
Posted by Sébastien Stormacq in Android on 22/07/2012
 |
This week-end, I decided to upgrade my “old” Nexus One smartphone to the latest (and greatest) Android version (4.1.1 aka Jelly Bean) although Google stopped shipping upgrades for this phone with Android 2.3, aka GingerBread. So, as you guessed, it requires to “root” the phone, i.e. to bypass system protections and to allow to install new software on it.The Android developer community is very active, there are a lot of information available on the web to do so, sometime somewhat cryptic, and not really step by step instructions.I am quite used to do this on iPhone, since several years now, but I am totally new to this on Android. I am using this blog entry to remind me the steps I took and – hopefully – to help others to decrypt existing tutorials. This is by no mean a complete step-by-step tutorial for rookie, rather a complement to the tutorial you will find on the net.Jelly Bean for Nexus One is made available by TexasIce on XDA Forums. Many thanks for the great work !Existing tutorials are available (part 1 and part 2) but I followed a quite different path. |
Step #0 : be sure to have the lastest Android SDK installed.
Step #1 : Install Black Rose bootloader. Although theoretically possible, I couldn’t manage to do this from Mac OS X. Black Rose distribution provides a Linux and Windows binary to automate the process to the maximum. Just launch it as root, look at your screen, wait for a couple of reboot … done !
I lost an hour because I did not start Black Rose as root on linux and it blocked during the process on
<waiting for the device>.
Be sure to start Black Rose as root !
I used a Virtual Machine with Ubuntu Natty and attached the Nexus One USB to the Virtual Machine – worked like a charm.
Step #2 : apply a small patch to HBoot, required for Jelly Bean
adb reboot bootloader
fastboot flash hboot hboot_jellybean_260-8-168.nb0
fastboot reboot-bootloader
You should see “Jelly Bean” on the second line
Step #3 : Flash Jelly Bean. I downloaded the TAR file (not the ZIP)
First wipe out everything from the device
fastboot erase userdata
fastboot erase cache
Then flash the system
tar -xf <release>.tar.xz
fastboot erase system
fastboot flash system system.img
fastboot erase boot
fastboot flash boot boot.img
Step #4 : Install Google App.
At this stage, Jelly Bean should start on your Nexus. It took me a while to realize that Google Apps are not installed by default. Consequence : Contacts are not synced with your Google account and – most importantly – no Google Play ! So it is not possible to install additional applications. You’ll have to install them yourself to get access to Google Now, Google Accounts (and synchro), Maps and Google Play !
Apps are available on XDA Forums as well (GApps 7/13 at the time of this writing)
Step #4.1 : I installed GApps using a custom recovery application : ClockWork. Download and installation instructions are here.
Step #4.2 : reboot in recovery mode to access ClockWork, then
use the menu system to put the Nexus One in USB Storage mode
- Copy GApps.zip to the flash card
- Use ClockWork’s menu to install GApps
- Reboot
and voilà you should have Jelly Beans + Google Apps running on your Nexus One.
A few things are not working so far :
- the Camera
- the trackball button to wake up the device
But the package is alpha software, so do expect updates and improvements in the coming weeks
Enjoy !
[UPDATE]
I upgraded with 20121113 nightly build (resuming my procedure from Step #3). I used the simplified update with
fastboot update Evervolv-perdo-3.1.0-passion-nightly-20121113-fastboot-update.zip
Also, clockwork do not need to be re-installed, it still lives in the recovery partition.
The system is much more responsive. The camera and trackball button work as expected.
I also used M2SD to move app to SD card. (be sure to partition the card as required)
Distributed Caching, also on Mac OS X
Posted by Sébastien Stormacq in IBM, Java, Mac OS X on 14/07/2012
IBM’s distributed caching system, WebSphere eXtreme Scale (formerly ObjectGrid) is a distributed, transactional object caching system for elastic scalability and extreme performance.
It can store any type of data and provides REST API as long with Java (HashMap, JPA, Hibernate, Spring) APIs. It also natively integrates with WebSphere Application Server and WebSphere Liberty Profile to cache HTTP session data.
It is supported on most platforms and – because it is a pure JavaSE application, it also works on Mac OS X, although this platform is not officially supported by IBM.
How to get started ?
- Download eXtreme Scale trial and unzip
- In a Terminal, go to product directory
- cd ObjectGrid/gettingstarted
- Run the Catalog Server
- ./runcat.sh
- Open another Terminal window and start an ObjectGrid server
- ./runcontainer.sh server0
- Repeat the last step to create several instances of ObjectGrid server
- Then experiment with client script. It provides basic CRUD operations from command line
- ./runclient.sh i key value
Congrats, you managed to setup a multi instance grid, in-memory cache system on your Mac.
To further understand how it works and how you can programmatically interact with the cache, refer to eXtreme Scale documentation.
Next step will be to demonstrate how eXtreme Scale integrates with Liberty to create a multi instance cluster with shared HTTP Session. Stay Tuned.
Enjoy !
WebSphere Application Server – Liberty Profile
Posted by Sébastien Stormacq in IBM, Java on 08/06/2012
When talking to developers about WebSphere Application Server Liberty Profile (the new lightweight, ultra fast and developer friendly profile for WAS), I always receive questions about supported JSRs and comparison with Java EE 6’s Web Profile.
Therefore I collected information from documentation, blogs, internal IBM forums etc … to create the following list.
(click to enlarge 🙂 )
This is *not* an official IBM document, just a compilation I gathered from various sources. Please feel free to point me any missing or incorrect entries.
[UPDATE]
The official list of API supported in Liberty profile is now published in WAS 8.5 product documentation.
[/UPDATE]
Enjoy !
Lotus Symphony Viewer – a free OpenDocument viewer on iPad
Posted by Sébastien Stormacq in IBM, iPhone, Oracle on 01/06/2012
I am using OpenOffice from 13+ years, before it was an open source suite and before it was acquired by Sun Microsystems (1999). At that time, StarOffice was the only cross platform productivity suite running on Windows, Linux and Solaris.
After Oracle abandoned the suite – and many other solutions in Sun Microsystems’ portfolio – the situation around Open Office is not easy to follow, let’s try to recap.
- A group of original developers from Sun, sponsored by Canonical, Novell, RedHat amongst others, forked OpenOffice and created LibreOffice.
- Oracle donated the original Open Office code base to the Apache Community, now published under an Apache v2 license
- Several large software editors have created derivative based on the OpenOffice code base, one of them being IBM’s Lotus Symphony (freely available)
Now that OpenOffice code base is not controlled by Oracle anymore, IBM decided to contribute its enhancement to the Apache OpenOffice project. This is important news for all OpenOffice users. This means that all improvements and changes made by IBM for Lotus Symphony will be made available for all in OpenOffice.
We are all looking forward the first release combining Apache OpenOffice and Lotus Symphony.
In the mean time, IBM released an iOS viewer application. It allows you to view Open Document Format (ODF) text documents, presentations, and spreadsheets downloaded to your phone or tablet without the need for any network connection.
IBM OpenDocument Viewer for iOS is freely available on the Apple App Store.

IBM Software Portfolio – the big picture
Posted by Sébastien Stormacq in IBM on 31/05/2012
Participate to your business processes from your iPad
Posted by Sébastien Stormacq in IBM, iPhone on 30/05/2012
BPM is a discipline that leverages software and services to provide total visibility into your organization. Discover, document, automate, and continuously improve business processes to increase efficiency and reduce costs.
If you are new to the field, have a look at the “BPM for Dummies” mini ebook.
IBM offers a comprehensive set of solutions to document, execute, monitor your business processes :
- BlueWorks Live, an easy way to document and run processes in the cloud
- IBM Business Monitor, unites information, process, and people to provide a 360-degree view of case information and achieve optimized outcomes
- IBM Business Process Manager, a comprehensive BPM platform giving you visibility and insight to manage business processes.
- IBM Operational Decision Management, provides the power to intelligently automate a wide range of decisions across business processes and applications (formerly iLog)
IBM recently released IBM BPM v8.0 with many new, redesigned or improved capabilities, one of them kept my attention. There is an iOS application allowing users to collaborate on BPM, right from their mobile devices.
“The BPM app provides a single view that consolidates tasks from multiple IBM process sources. Built with ease of use and collaboration in mind, it allows users to interact with others to ensure that the right people are working on the right thing at the right time.”
The application is freely available on the Apple App Store (but requires a BPM backend)

Free, half day IBM Developer Conference @ Luxembourg
Posted by Sébastien Stormacq in IBM, Java on 29/05/2012
On Wednesday, June 13rd, IBM Luxembourg invites you to a free technical conference for application developers.

The objective of this session is to provide participants an overview of the new lightweight tools IBM is providing to developers :
- the new WebSphere Application Server Liberty Profile,
- the Eclipse based WAS Developer Tools
- Worklight, a cross platform development and deployment environment for mobile applications.
Agenda, venue and conference details is available in this invitation.
Interested, feel free to register by sending me an email at sebastien.stormacq at be.ibm.com Seating is limited – do not wait !


