Archive for category Mac OS X
Mac OS X makes handling SSH keys easier
Posted by Sébastien Stormacq in Apple, General, Mac OS X on 06/05/2014
I discovered something this Sunday morning that will make my day, week and month 🙂
If you don’t know much about ssh-agent or if you’re looking for a tutorial about using ssh public key authentication or ssh-agent, read one of the excellent articles linked from here before to continue here.
On OSX, Apple made it much easier to manage your SSH keys and to work with SSH, by adding two welcome improvements
- They added
ssh-agentto launchd(8) - They added
ssh-agentsupport for KeyChain
The first improvement alleviate user’s need to manually start ssh-agent for every session. launchd(8) will also makes sure ssh-agent is automatically restarted in case of crash.
Launchd configuration file is here:
hostname:~ user$ cat /System//Library/LaunchAgents/org.openbsd.ssh-agent.plist <?xml version="1.0" encoding="UTF-8"?> <!DOCTYPE plist PUBLIC "-//Apple Computer//DTD PLIST 1.0//EN" "http://www.apple.com/DTDs/PropertyList-1.0.dtd"> <plist version="1.0"> <dict> <key>Label</key> <string>org.openbsd.ssh-agent</string> <key>ProgramArguments</key> <array> <string>/usr/bin/ssh-agent</string> <string>-l</string> </array> <key>ServiceIPC</key> <true/> <key>Sockets</key> <dict> <key>Listeners</key> <dict> <key>SecureSocketWithKey</key> <string>SSH_AUTH_SOCK</string> </dict> </dict> <key>EnableTransactions</key> <true/> </dict> </plist> |
But the best part is the second improvement : instead of storing your keys in .pem files in your ~/.ssh directory, you can tell ssh-agent to store your keys in the more secured KeyChain trusted store, as show on the picture below.
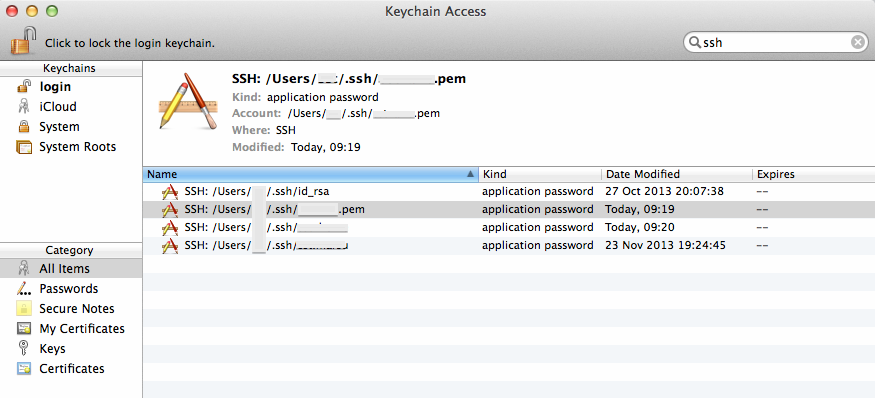
Apple silently added a -K option to ssh-add command to instruct ssh-add to store your SSH key in KeyChain in addition to loading the key in memory. ssh-agent will search for keys in their usual location on disk but also in Keychain.
What are the benefits of this?
There is no more need to explicitly call ssh-add when your session start, like you used to do in your .profile or .bashrc file. LaunchD will load ssh-agent and will instruct it to load keys referenced in your KeyChain. Note that the .pem file is not stored into KeyChain, you can not delete these from your file system.
Finally, because Keychain might synchronise across your machines through iCloud, your keys’ password are now available automatically on all your machines (provided you’re willing to keep a copy of your keys in iCloud – but that’s a different story)
Enjoy!
WebSphere Liberty Profile Cluster Sharing an In-Memory Data Grid
Posted by Sébastien Stormacq in IBM, Java, Mac OS X on 14/10/2012
WebSphere Liberty Profile is a fast, lightweight and simple Java web application container allowing developer to develop, test and deploy applications easily. In my previous articles, I explained how to install Liberty Profile on Mac and how to develop and deploy your first REST based services.
Liberty Profile is a standalone Java container. It is not designed to be included in larger deployments based on WebSphere Application Server ND cells.
However, Liberty Profile can take benefit of a shared persistence engine to store HTTP Session data. This allows two or more independent Liberty Profile instances to share a common user session for web applications. When one instance fails, the surviving instances can continue to serve user requests as-is nothing happened.
Persistent data store might be a relational database (such as Derby used for development purposes) or a in-memory data grid. In-Memory Data Grid are software solutions providing in-memory data storage, replicated across different containers (or machines). Many IMDG solutions are available from different vendors or in open-source. Most common ones are MemCached, Terracotta (Software AG), Coherence (Oracle) and IBM’s WebSphere eXtreme Scale.
If you are totally new to eXtreme Scale, I would recommend to read some basic information about its architecture before continuing to read this article.
Configuring WebSphere Application Server (WAS – full profile) to store HTTP Session in a eXtreme Scale container is a matter of three clicks in WAS admin console. It is slightly more complicate with Liberty Profile, just a few configuration steps described below.
There are four different ways to install eXtreme Scale (XS) with Liberty :
- Run XS Container in a separate JVM or separate machine than Liberty Profile
- Run XS Container inside the same JVM as Liberty Profile
- Use Liberty Profile as client for an XS container
- Configure Liberty Profile to store HTTP Session data to an XS container
In this article, I will show you how to configure Liberty Profile to
- Start an XS server within the same JVM as Liberty profile
- Store HTTP Session data in this in-memory data grid,allowing to create clusters of Liberty Profile Instances
My final architecture is depicted in the image below.

0. Download and Install Liberty Profile and eXtreme Scale for Liberty Profile (both solutions are available at no charge from IBM – with forum based and peer-to-peer support only).
- Liberty Profile installation is described in my previous blog entry.
- eXtreme Scale for Liberty Profile installation is just a matter of unzipping the file in the directory above wlp
1. Create two servers instances
cd wlpBLOG sst:wlpBLOG sst$ ./bin/server create ServerONE Server ServerONE created. sst:wlpBLOG sst$ ./bin/server create ServerTWO Server ServerTWO created. |
2. Change default HTTP Port in both server.xml so that the two instances can run in parallel
<httpEndpoint host="localhost" httpPort="9080" httpsPort="9443" id="defaultHttpEndpoint"/> |
3. Add two features in server.xml for each server. One to tell Liberty to run an XS server embedded. And one to tell Liberty to use XS as HTTP Session store for web applications.
<!-- Enable features --> <featureManager> <feature>jsp-2.2</feature> <feature>localConnector-1.0</feature> <feature>eXtremeScale.server-1.0</feature> <feature>eXtremeScale.web-1.0</feature> </featureManager> |
4. Configure the the WXS container inside Liberty Profile : add WXS configuration in Liberty Profile
<!-- Configuration for XS Server --> <xsServer isCatalog="true" serverName="XS_ServerONE"/> <!-- Configuration for Web Application XS HTTP Session data storage --> <xsWebApp catalogHostPort="localhost:2809" objectGridType="REMOTE" replicationInterval="0" reuseSessionId="true" securityEnabled="true" sessionTableSize="0"/> |
5. Configure the the WXS container inside Liberty Profile : add XML configuration files in WLP runtime directory
In the directory WLP_HOME/usr/servers/ServerONE, create a “grids” directory and drop those two files
deployment.xml
<?xml version="1.0" encoding="UTF-8"?> <deploymentPolicy xmlns:xsi="http://www.w3.org/2001/XMLSchema-instance" xsi:schemaLocation="http://ibm.com/ws/objectgrid/deploymentPolicy ../deploymentPolicy.xsd" xmlns="http://ibm.com/ws/objectgrid/deploymentPolicy"> <objectgridDeployment objectgridName="session"> <mapSet name="sessionMapSet" numberOfPartitions="47" minSyncReplicas="0" maxSyncReplicas="0" maxAsyncReplicas="1" developmentMode="false" placementStrategy="FIXED_PARTITIONS"> <map ref="objectgridSessionMetadata"/> <map ref="objectgridSessionAttribute.*"/> <map ref="objectgridSessionTTL.*"/> </mapSet> </objectgridDeployment> </deploymentPolicy> |
objectgrid.xml
<?xml version="1.0" encoding="UTF-8"?> <objectGridConfig xmlns:xsi="http://www.w3.org/2001/XMLSchema-instance" xsi:schemaLocation="http://ibm.com/ws/objectgrid/config ../objectGrid.xsd" xmlns="http://ibm.com/ws/objectgrid/config"> <objectGrids> <objectGrid name="session" txTimeout="30"> <bean id="ObjectGridEventListener" className="com.ibm.ws.xs.sessionmanager.SessionHandleManager"/> <backingMap name="objectgridSessionMetadata" pluginCollectionRef="objectgridSessionMetadata" readOnly="false" lockStrategy="PESSIMISTIC" ttlEvictorType="LAST_ACCESS_TIME" timeToLive="3600" copyMode="COPY_TO_BYTES"/> <backingMap name="objectgridSessionAttribute.*" template="true" readOnly="false" lockStrategy="PESSIMISTIC" ttlEvictorType="NONE" copyMode="COPY_TO_BYTES"/> <backingMap name="objectgridSessionTTL.*" template="true" readOnly="false" lockStrategy="PESSIMISTIC" ttlEvictorType="LAST_ACCESS_TIME" timeToLive="3600" copyMode="COPY_TO_BYTES"/> </objectGrid> </objectGrids> <backingMapPluginCollections> <backingMapPluginCollection id="objectgridSessionMetadata"> <bean id="MapEventListener" className="com.ibm.ws.xs.sessionmanager.MetadataMapListener"/> </backingMapPluginCollection> </backingMapPluginCollections> </objectGridConfig> |
6. Tell Liberty’s session manager to reuse the same session ID for all user’s requests, even if handled by different JVM (See Liberty’s documentation for more details)
<httpSession idReuse="true"/> |
7. Start Liberty Profile
sst:wlpBLOG sst$ ./bin/server start ServerONE Server ServerONE started with process ID 11769. |
In the logs, wait for the following line
[AUDIT ] CWWKF0011I: The server ServerONE is ready to run a smarter planet.
8. Create & Deploy a simple JSP file for testing
Create a Dynamic Web Project in Eclipse, and add the following index.jsp page
<%@page contentType="text/html" pageEncoding="UTF-8"%> <!DOCTYPE HTML PUBLIC "-//W3C//DTD HTML 4.01 Transitional//EN" "http://www.w3.org/TR/html4/loose.dtd"> <html> <head> <meta http-equiv="Content-Type" content="text/html; charset=UTF-8"> <title>Liberty Profile Cluster Demo</title> </head> <body> <h1>Liberty Profile - eXtreme Scale HTTP Session Demo!</h1> <% |
Integer count; Object o = session.getAttribute("COUNT"); if (o != null) { count = (Integer) o; count = count + 1; } else { count = 1; } session.setAttribute("COUNT", count); |
%>
<h3>This counter is increased each time the page is loaded.  Its value is stored in the <code>HttpSession</code></h3>
<h3><font color="#FF0000">Counter = <%=count%></font></h3>
<h4>Page server by cluster instance : <font color="#FF0000"><b><%= System.getProperty("wlp.server.name") %></b></font></h4>
<br/>
Page generated at = <%=new java.util.Date().toString()%><br/>
<br/>
</body>
</html> |
Then deploy the WAR to the server instance (example of creating a WAR and deploying it to Liberty is given in my previous blog post)
9. Test, open your favorite browser and connect to http://localhost:9080/
You should see the following screen

Each time you will refresh the page (CTRL-R), the counter should be increased by one
Congrats, you have your first instance up and running, let’s now configure a second instance.
Repeat Steps 2-7 on a second Liberty instance to create a second cluster member. Remember to change the following
- The name of the instance
- The HTTP and HTTPS ports used by Liberty Profile (step 2 above)
- The WXS configuration – only one catalog server is needed (step 3 above, change isCatalog=”no”)
- You do not need to copy the XML files in the grids directory of the second instance (step 5) – This is only required on the instance running XS’ Catalog Server
Then deploy your test application to instance #2. To test your application, point your browser to
http://localhost:9081/<YOUR APPLICATION NAME>
You should see a page similar to the one shown at step 9 above. Try to alternatively reload the page from ServerONE and the page from ServerTWO : you should see the session counter to increase in a sequence across the two server instances.
You’ve just created your first Liberty Profile cluster with two instances and a shared in-memory grid for HTTP session storage.
I leave you as an exercise to install and configure a load balancer in front of these two instances. Hint : I am using the open-source balance for demo / test purpose.
If you find errors / typos in this (long) article, let me know – I will fix them – Thanks !
Enjoy !
How to install WebSphere 8.5 Liberty profile on Mac
Posted by Sébastien Stormacq in IBM, Java, Mac OS X on 09/09/2012
WebSphere 8.5 Liberty Profile is a small, fast, agile WebSphere runtime that you – developers – can use to develop, test or embed in your applications. The runtime is provided free of charge from IBM. Like every Java EE Profile, it implements a subset of the Java EE Specification, while ensuring 100% “upwards” fidelity to the full WebSphere Application Server.
On my i7 – quad core – machine, WAS Liberty starts in less than 1 sec. With not application deployed.
Installing the runtime is as easy as unzipping a file on your drive, here are the steps
- download from wasdev.net (46 Mb only)
- unzip
java -jar wlp-developers-8.5.0.0.jar
After displaying and approving the distribution license, you will be ready for the next step
- Optional : create a server instance (an instance “defaultServer” is created for you automatically, this step is optional)
# cd wlp
# chmod u+x bin/server
# ./bin/server create MyInstance
Server MyInstance created.
- start it
# ./bin/server start MyInstance
Or just this line to start the default instance
#./bin/server start
Server MyInstance started with process ID 59946.
Now that you have the runtime, you are ready to install the tooling to manipulate it from Eclipse.
- Start Eclipse (Indigo or Juno)
- Open Eclipse MarketPlace

- Search for “liberty” and click on “Install”
- In the “Eclipse” menu, click on “Preferences”
- In the “Preferences” pane, select “Server”, then “Runtime Environment” and click on “Add”
- Select “WebSphere Application 8.5 Liberty Profile”
- Give the name you want, point to your Installation directory (see bullet 2 in the installation instructions above) and click “Finish”
- Switch to the “Server” window in the “Java EE” perspective
- Right-click – New -> Server, choose your newly created runtime instance
- Don’t leave the “Server” window, right click on the server name and choose “Start”


The “Console” window should automatically open, and within a few seconds, you should see the following line to appear :
Launching default (wlp-1.0.0.20120428-1251/websphere-kernel_1.0.0) on Java HotSpot(TM) 64-Bit Server VM, version 1.7.0_07-b10 (en_US)
[AUDIT   ] CWWKE0001I: The server default has been launched.
[AUDIT   ] CWWKZ0058I: Monitoring dropins for applications.
[AUDIT   ] CWWKF0011I: The server default is ready to run a smarter planet.
You have now a fully functional WebSphere Liberty profile installed and the corresponding tooling in Eclipse. The tooling allows you to stop/start the application server, but also to manage its configuration and, obviously, to deploy applications on it.
In the next blog entry, I will show you how to deploy a REST based web service on Liberty
Enjoy !
Distributed Caching, also on Mac OS X
Posted by Sébastien Stormacq in IBM, Java, Mac OS X on 14/07/2012
IBM’s distributed caching system, WebSphere eXtreme Scale (formerly ObjectGrid) is a distributed, transactional object caching system for elastic scalability and extreme performance.
It can store any type of data and provides REST API as long with Java (HashMap, JPA, Hibernate, Spring) APIs. It also natively integrates with WebSphere Application Server and WebSphere Liberty Profile to cache HTTP session data.
It is supported on most platforms and – because it is a pure JavaSE application, it also works on Mac OS X, although this platform is not officially supported by IBM.
How to get started ?
- Download eXtreme Scale trial and unzip
- In a Terminal, go to product directory
- cd ObjectGrid/gettingstarted
- Run the Catalog Server
- ./runcat.sh
- Open another Terminal window and start an ObjectGrid server
- ./runcontainer.sh server0
- Repeat the last step to create several instances of ObjectGrid server
- Then experiment with client script. It provides basic CRUD operations from command line
- ./runclient.sh i key value
Congrats, you managed to setup a multi instance grid, in-memory cache system on your Mac.
To further understand how it works and how you can programmatically interact with the cache, refer to eXtreme Scale documentation.
Next step will be to demonstrate how eXtreme Scale integrates with Liberty to create a multi instance cluster with shared HTTP Session. Stay Tuned.
Enjoy !
Using MacPorts with Xcode 4.3.x
Posted by Sébastien Stormacq in Apple, Mac OS X on 11/03/2012
If you recently updated to the MacAppStore distribution of Xcode, you certainly noticed that the /Developer directory is not used anymore. Xcode now lives in standard /Applications directory.
This confuses tools relying on Xcode, such as some MacPorts package relying on Xcode to compile code on your machine before installation.
For example :
---> Fetching archive for zlib
---> Attempting to fetch zlib-1.2.6_0.darwin_11.x86_64.tbz2 from http://packages.macports.org/zlib
---> Fetching zlib
---> Attempting to fetch zlib-1.2.6.tar.bz2 from http://lil.fr.distfiles.macports.org/zlib
---> Verifying checksum(s) for zlib
---> Extracting zlib
Error: Couldn't determine your Xcode version (from '/usr/bin/xcodebuild -version').
(more line stripped for clarity)
This can be solved with a single command line terminal, to tell Xcode command line tools the new location of Xcode.
sudo xcode-select -switch /Applications/Xcode.app/Contents/Developer/
I am still unsure this an Apple bug or a MacPort bug … I am keen to read your opinion about this.
Enjoy !
Apple patches 3 years old bug
Posted by Sébastien Stormacq in Apple, Mac OS X on 01/03/2012
There are so many blogs written to criticize Apple, how big, arrogant and control freak they become over the last pas years (some will say they always have been control-freak…) that I wanted to write this post to actually say “Kudo Apple ! & Thank you”
I am using MacBookPro’s since the last 6-7 years or so. The last one I acquired is the Late 2008 model. This machine suffered from day #1 of a serious display issue : the upper part of the screen flickers under some load / heat condition.
Problem has been reported numerous times to Apple and the discussion about this issue on Apple’s Support Community forum contains more than 1500 messages posted and close to 190.000 views !
Yesterday, Apple quietly release an EFI firmware patch to address this issue. Yes, you read it right, Apple did release a firmware patch for a 4 years old machine. This is so unusual in (consumer) IT industry to mention.
I applied the patch yesterday after having spent an hour or so reading comments from early adopters and I have the pleasure to work on my machine since then without any single screen flickering.
Thank you Apple to take care of old customers, old machines and continue to improve your products.
MacPort on Mac OS X Lion
Posted by Sébastien Stormacq in Apple, Mac OS X on 21/07/2011
If you have performed a fresh install of Mac OS X Lion or if you plan to install MacPort after having installed Lion, you will soon realize that the MacPort team does not distribute (yet) a Lion installer. Snow Leopard installer will fail when detecting Lion.
Question is therefore : how to install MacPort on Lion ? Answer : install it from the sources.
It might be scarry, but it is very easy, here are the details.
Preriquisite : install Aple’s development tool XCode. It is freely available from the App Store (be patient it is a 3.5 Gb download)
- Open a terminal
- create a directory for the sources
mkdir macport.sources
- Fetch the sources
cd macport.sources
sudo svn checkout http://svn.macports.org/repository/macports/trunk
- Compile
cd trunk/base
sudo ./configure --enable-readline
sudo make install
- Install
sudo make distclean
- Change your profile to include MacPort in the PATH
vi $HOME/.profile
#!/usr/bin/bash
# MacPort
export PATH=$PATH:/opt/local/bin
- Source your profile to include the changes
. $HOME/.profile
That’s it ! Easy as I promised.
You can now search for package with
sudo port list | grep <your search>
and install packages with
sudo port install <package name>
Enjoy !
First run of OpenJDK 1.7 for Mac OS X
Posted by Sébastien Stormacq in Java, Mac OS X on 26/11/2010
My colleague Alexis recently shared a couple of links on Twitter to DMG files containing recent builds of OpenJDK for Mac OS X.
These builds are created by the community for the community – they are experimental and are probably not stable. Thanks Gildas and Henri for your work !
I downloaded the 64 bits version (32 bits version also available) and installed it in a couple of minutes. These builds install in Apple proposed location : /Library/Java/JavaVirtualMachines
First test is obviously :
marsu:~ sst$ /Library/Java/JavaVirtualMachines/openjdk-1.7-x86_64/bin/java -version
openjdk version "1.7.0-internal"
OpenJDK Runtime Environment (build 1.7.0-internal-henri_2010_11_25_16_22-b00)
OpenJDK 64-Bit Server VM (build 20.0-b02, mixed mode)
Then I configured Netbeans to use that JDK to compile and run projects :

Netbeans 6.9 has build in modules to support some upcoming Java SE 7 syntax, such as the language simplifications proposed by project Coin.

BTW, should you want to create the builds yourself, everything is documented – you can even start a continuous build with Hudson. You can then download specific scripts to build OpenJDK on MacOSX and to create the installation packages (Will require Apple’s Developer Tools to be installed)
Enjoy !
How to remotely capture a core dump on a Mac ?
Posted by Sébastien Stormacq in Mac OS X on 21/06/2010
Mac OS X is usually a very stable OS, over the last 10 years I can count on my fingers the rare number of cases when the system entirely crashed and required a reboot.
(I am not counting the deliberate attempts to make it crash , playing with development version of kernel modules or very very early builds of all kinds)
Since a couple of months however, I am able to crash the entire system just using iTunes.
When downloading multiple files simultaneously or when starting any type of concurrent disk access for several minutes, iTunes freezes, bringing the whole system down with him.
It looks like this is linked to my type of machine (iMac 24″) as I can not reproduce on any other three machines at home. I am not the only one experiencing this issue. Apple’s support forums host a thread here and another here with people describing exact similar symptoms (some of them with PowerMacs too)
As I am part of the Apple developer Program, I opened a bug report to request attention about this.
Surprisingly, Apple answered with 2-3 weeks asking for more details, in particular, a stack trace of the system while in frozen state.
Stackshot can be enabled as follows:
sudo launchctl load -w /System/Library/LaunchDaemons/com.apple.stackshot.plist
Then, type the following chord:
Control-Option-Command-Shift-Period
a file will be written out /Library/Logs/stackshot.log and a symbolized file will be written to /Library/Logs/stackshot-syms.log
Unfortunately, this does not help in my case as the whole system was unresponsive when the crash occurs, I have no possibility to type any command while the system is frozen.
Apple then asked me to produce a core dump, using Non Maskable Interrupt trigger and a remote core dump server.
Basically, the idea is to configure the kernel to let it send a core dump to a remote server, through the network. On another machine, you’ll have to setup the core dump server, i.e. a process that will listen on the network, will accept the connection from the crashed kernel and will dump the data to a file on disk.
Once the kernel client and the core dump server configured, you need to tell the kernel to generate the data and send them to the remote server. For this top happen, you’ll need to force a panic with DTrace for example.
But in my case, the kernel is not panicking, just freezing.
I had to generate a Non Maskable Interrupt to activate the debugging process. Once properly configured as described in Apple Technical Note, this is a simple as shortly pressing the POWER button.
This method is explained with many details and options in Apple technical Note TN2118. It is surprisingly easy to setup and allows to collect valuable debugging information for developers. I am attaching a screen shot of the crashed machine while in this state.

I hope Apple will be able to provide a fix for this issue.
My First iPhone Application : a RPN Calculator
Posted by Sébastien Stormacq in Mac OS X on 21/08/2008
| I took the time to digg around the iPhone Development Kit. Giving the background I already have with Objective-C and Cocoa development, I jumped in quite easily.
My first application (well, the second actually, after HelloWorld) was a RPN calculator, modeled around my old HP 32S. I have to admit I implemented only the basic arithmetic operations, not the whole range of the HP 32S features … but this was not my objective. I now started something more ambitious which include geolocalized services and Google Map mashup. I will keep you informed. |
 |